


Photo by Ingo Stiller on Unsplash
How to Create Your First API with Nest Effortlessly
Create a NestJS API with Minimal Effort


When I write articles with examples or code MVP , I need to show some data in most of the cases JSON-server save me, or use open APIs to retrieve and post data. However, there are times when we may require specific features, such as uploading files, returning PDF files, managing images, or implementing logic to process requests and return custom data. In these these scenarios json-server or free API is not enough.
So, if I want to create better MVPs projects or articles, I have to build an API that fits my requirements. How can a frontend Angular create an API without hassle? My solution is to use Nest!
Today, I want to jumpstart with NestJS, demonstrating how easy it is for Angular developers to build a basic API for returning and posting data, as well as consuming it in Angular.
Let's begin.
Why Nest
Last summer, Bezael Pérez and I played together, building a basic Nest API to return products for a workshop about microfrontends. It was painless. Nest helped us to create and configure an out-of-the-box API easily. NestJS is more than just REST APIs, supporting microservices and GraphQL as well.
Nest looks and works similarly to Angular app structure, making it easy to reuse my Angular skills with it. Instead of components, it uses controllers, and features like interceptors, pipes, guards, or decorators work in the same way.
Let's show and create the API!
Create The API
First, be sure to have Node.js installed, then install Nestjs CLI by running the command npm i -g nestjs in the terminal.
npm i -g nestjs
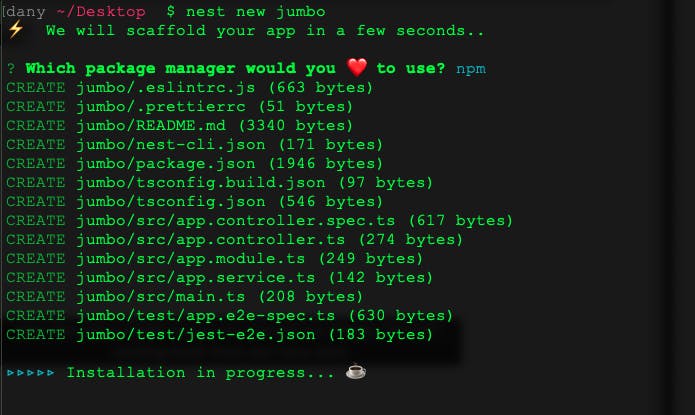
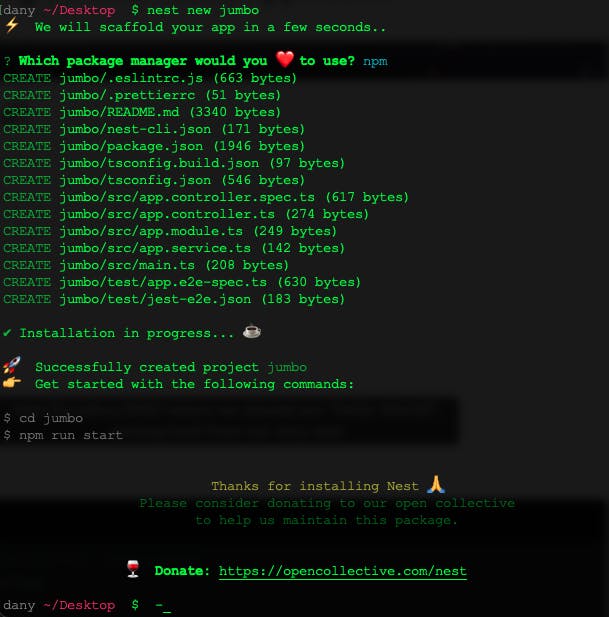
To create our first API, we use nest new command, for example, nest new jumbo to generate the project.
After finishing, let's change to the jumbo directory by typing cd jumbo to run the application. By running the command npm start, it starts our new application at http://localhost:3000.
Great! We now have a basic API that returns "Hello world."
Nest provides other scripts like development mode: npm run start:dev. It listens for every change and automatically reloads our application.

Perfect, we now have a sample API, so let's dive into the Nest file structure.
Understand Nest Structure
If you're familiar with Angular, like me, the Nest structure will seem familiar as it resembles an Angular app. The main difference is that instead of components, Nest uses controllers.
The generated Nest application contains controllers, services, and modules (also works with interceptors, pipes, and guards), closely resembling an Angular application.
The main.ts is the entry point for our app; it calls NestFactory.create(AppModule) to start the app.
If you come from Angular the Modules sounds familiar again).
import { NestFactory } from '@nestjs/core';
import { AppModule } from './app.module';
async function bootstrap() {
const app = await NestFactory.create(AppModule);
await app.listen(3000);
}
bootstrap();
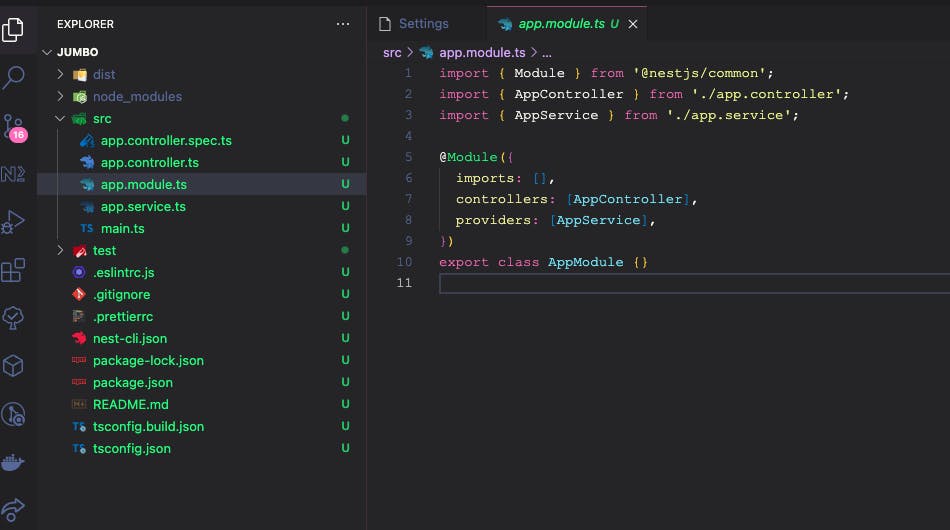
Open the app.module.ts it looks like an Angular Module with imports, controllers, and providers, it takes the responsibility to register the services, modules and controllers.
import { Module } from '@nestjs/common';
import { AppController } from './app.controller';
import { AppService } from './app.service';
@Module({
imports: [],
controllers: [AppController],
providers: [AppService],
})
export class AppModule {}
Open app.controller.ts, it is a class with the decorator @Controller help to handle the request to the application. The decorator @Controller supports a string as a parameter to point to the path, like '/users' or auth, in this scenario the controller is empty because is the entry point.
import { Controller, Get } from '@nestjs/common';
import { AppService } from './app.service';
@Controller()
export class AppController {
constructor(private readonly appService: AppService) {}
@Get()
getHello(): string {
return this.appService.getHello();
}
}
Finally, the service work like our services in Angular to encapsulate the logic for our application using the decorator @Injectable() to register in the app.module.
import { Injectable } from '@nestjs/common';
@Injectable()
export class AppService {
getHello(): string {
return 'Hello World!';
}
}
Now that we have a basic understanding of Nest and its applications, it's time to write some code.
Building Rest API
My idea is to extend the scaffolding project jumbo_api with the following points:
Create a Controller and Get Data
Work with parameters and Post
Handle the response
Consume from Angular
Dockerize the API and Client
The Controller
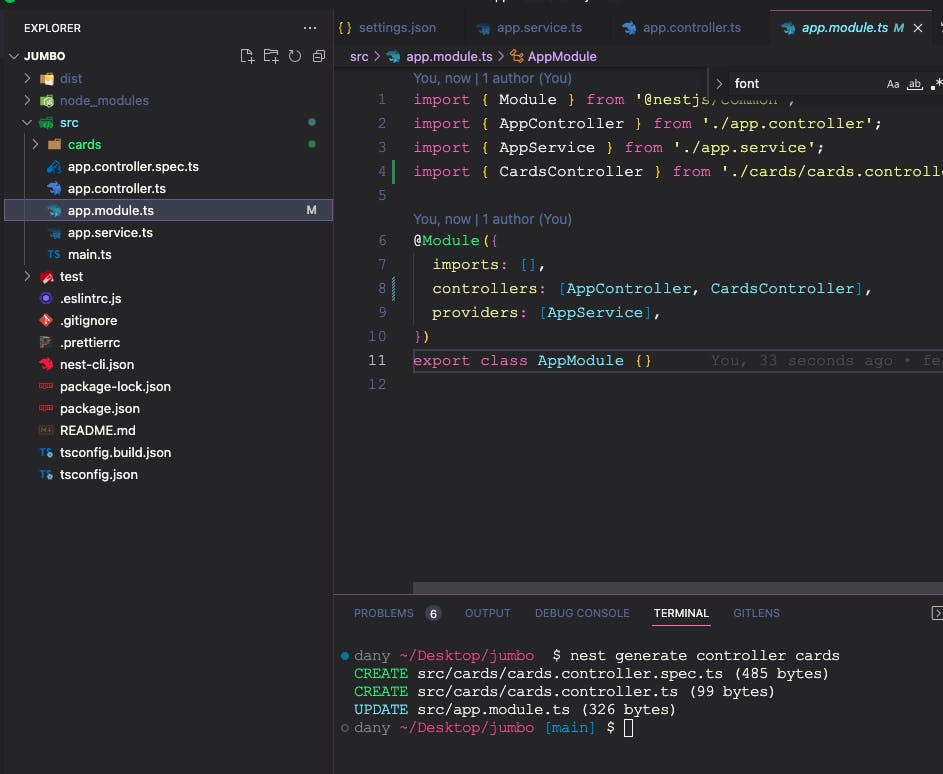
Let's begin by creating a basic 'cards' controller using the command `nest generate controller cards`. This command automatically generates and registers the card controller in the app.module within the controllers array, a process that may be familiar to those who have used Angular CLI.
nest generate controller cards
The controller handle request to the application by using the decorator, @Controller, with the name to map the routing to it.
Get The Data
We want to return a list of cards, which in our case is an array containing two objects. Each object includes the id, code, and expiration date.
Create the method getAll() and return the array with the objects. Above the method name, add the decorator @Get, which lets the controller know which method will handle the GET request to the cards route.
 @Controller('cards')
 export class CardsController {
   @Get()
   getAll() {
     return [
       {
         id: 1,
         code: '123546',
         validDate: new Date().toLocaleDateString('ES'),
       },
       {
         id: 2,
         code: '123547',
         validDate: new Date().toLocaleDateString('ES'),
       },
     ];
   }
 }
Save changes and run the application with npm run start:dev , using the browser, navigate to http://localhost:3000/cards/
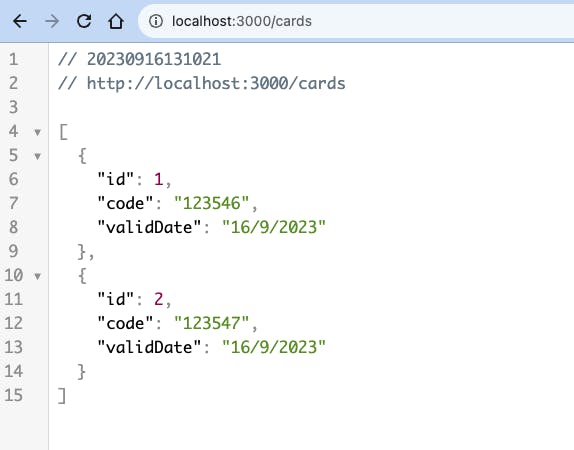
To visualize the JSON response like this, I recommend using JSONViewer extension
Perfect, but perhaps we want to set a specific path for our cards, such as 'cards/list'. To achieve this, add the 'cards' as a parameter to the @Get decorator.
import { Controller, Get } from '@nestjs/common';

@Controller('cards')
export class CardsController {
  @Get('list')
  getAll() {
    return [
      {
        id: 1,
        code: '123546',
        validDate: new Date().toLocaleDateString('ES'),
      },
      {
        id: 2,
        code: '123547',
        validDate: new Date().toLocaleDateString('ES'),
      },
    ];
  }
}
Save changes (because we are using watch mode, it reloads the server automatically)
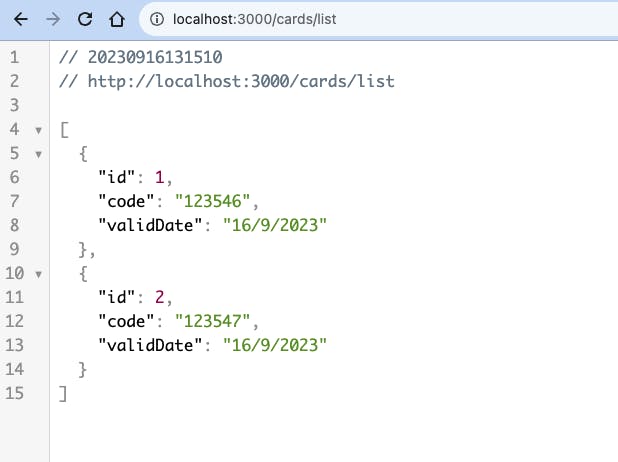
Great! The API is functioning and returning data. Our next step is to read information from the parameters and combine it with the response. Let's get to it!
Read Parameters
To read parameters in the controller, we need to capture these values dynamically from the request. For example, we should create a new endpoint, such as cards/generate/, which retrieves the user's name and returns a card object with the property name. How can we accomplish this?
First, create a new method called generateCard and add the @Get decorator, passing :name as an argument. This indicates that a dynamic parameter named "name" is expected.
Inside the generateCard method, add a parameter called "name" with the type Param(). If we don't specify the parameter to retrieve in the @Param decorator, we will receive all parameters in the request object. However, we can choose to specify the expected parameter, in our case, "name":
The method signature should look like this:
@Get('generate/:name')
  generateCard(@Param('name') name: string)
....
After that, add a return statement with an object and bind the name property to it. The final code should look like:
 @Get('generate/:name')
  generateCard(@Param('name') name: string) {
    return {
      id: 2,
      code: '12334',
      validDate: new Date().toLocaleDateString('ES'),
      name,
    };
  }
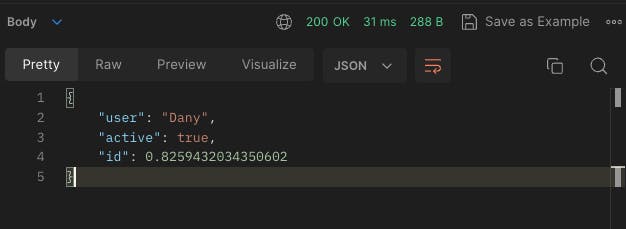
Save the changes. In the browser, navigate to http://localhost/cards/generate/lebronjames, and the response should appear as follows:
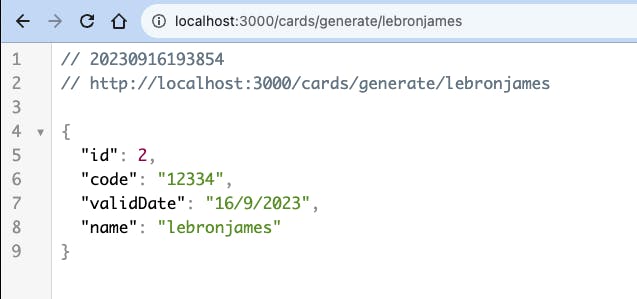
Perfect, we can read parameters in the GET request, but what about handling POST requests in our API?
Working With Post Data to API
An API involves more than just GET requests; we also need to send information via POST requests and read the payload. Thankfully, Nest provides additional decorators like @Post and @Body to address this.
Let's create a new method subscribe with the @Post decorator and add the @Body parameter, and use it within the method.
@Post()
  subscribe(@Body() body) {
    return {
      body,
      id: Math.random().toFixed(),
    };
  }
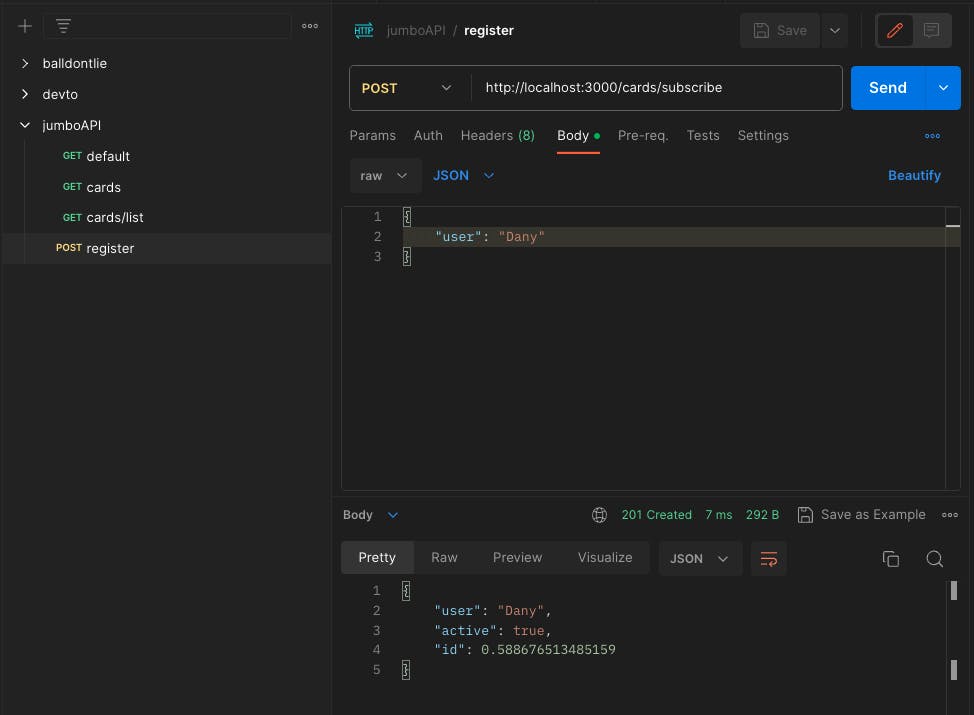
The GET request can be executed by the browser, but to make a POST request to an API, we need to use a client; in my case, I use Postman.
Use Postman to send data to the API at http://localhost:3000/cards/subscribe. In the options, select 'Body', choose 'raw' and 'JSON'. In the body, add a JSON with the property name and click the send button.
The API responds with a 200 status, including the user data sent in the body and a random value, as shown in the following image:
Learn more about using PostMan with Post
Great, we're sending data to the API, processing the request, and handling the response by adding our logic.
By default, the API returns HTTP code 200 for GET requests and 201 for POST requests, which is exactly what I expect. But how can we configure or change this?
Handle Responses
As with many of our tasks, Nest provides a decorator to specify the HTTP status code. Use @HttpCode() to change from 201 to 200, or "OK," in the POST request. Add the decorator above the "subscribe" method and, as a parameter, include HttpStatus.OK.
The final code looks like this:
 @Post('subscribe')
  @HttpCode(HttpStatus.OK)
  subscribe(@Body() body) {
    return {
      ...body,
      active: true,
      id: Math.random(),
    };
  }
Run the postman to the subscribe method again, the response the status code is 200 yeah!!
Finally, we have a basic API for getting and posting data, but how can I integrate it into my applications?
Consume API with Angular
To consume the jumbo_api, create an Angular application using angular/cli and run the command ng new jumbo_web --standalone from the terminal.
I'm using Angular 16, which support standalone app with the flag --standalone
ng new jumbo_web --standalone
? Would you like to add Angular routing? No
? Which stylesheet format would you like to use? SCSS   [
https://sass-lang.com/documentation/syntax#scss
Open the app.config.ts file and within the appConfig providers, add the provideHttpClient() function.
import { ApplicationConfig } from '@angular/core';
import { provideRouter } from '@angular/router';
import { provideHttpClient, withJsonpSupport } from '@angular/common/http';
import { routes } from './app.routes';

export const appConfig: ApplicationConfig = {
  providers: [provideRouter(routes),
    provideHttpClient()
  ]
};T
To consume the API we create a service jumbo by running the`ng g s /service/jumbo` command.
We need to make GET and POST requests to the Jumbo API. We will combine RxJS and Signals (yes, Signals, the new reactive system in Angular)
By using httpClient we request the data to API and convert the observable to signals using toSignal function and stores it into the cards signals
cards = toSignal<any>(this.#http.get<[]>(`${this.#API}/list`));
Create the generate method to post the user's name, utilizing the "/subscribe" post endpoint. This method takes the name, sends it to the API using the post method, and updates the generatedCard signal with the "set" method.
The final code looks like this:
import { HttpClient } from '@angular/common/http';
import { Injectable, inject, signal } from '@angular/core';
import { toSignal } from '@angular/core/rxjs-interop';

@Injectable({ providedIn: 'root' })
export class CardsService {
  #http = inject(HttpClient);
  #API = 'http://localhost:3000/cards';

  cards = toSignal<any>(this.#http.get<[]>(`${this.#API}/list`));
  randomCard = signal<unknown>(undefined);

  generate(name: string) {
    this.#http.post<any>(`${this.#API}/subscribe/`, {
      name
    }).subscribe((response: unknown) => {
      this.randomCard.set(response)
    })
  }
}
Render The Data
Open the app.component.ts to perform the following actions:
Inject the jumbo service
Consume the signals properties cards and generated
Create a method to post the data by using the jumbo service.
First, inject and declare the variables cardservice, cards and generated :
  #cardsService = inject(CardsService)
  cards = this.#cardsService.cards;
  generated = this.#cardsService.randomCard;
Create the generateCard method to call the generate service method.
 generateCard(name: string) {
    this.#cardsService.generate(name);
  }
In the HTML Markup add input with template reference to send the value to the generated method.
<label for="name">Your name:</label><input id="name" type="text" #name>
Add the button with binding the click event to the generate method and passing the template reference value.
<button (click)="generateCard(name.value)">Generate</button>
Use generated with a ngIf to show the value from signal generated variable.
<div *ngIf="generated()">
      Thanks for register your card is : {{generated()}}
    </div>
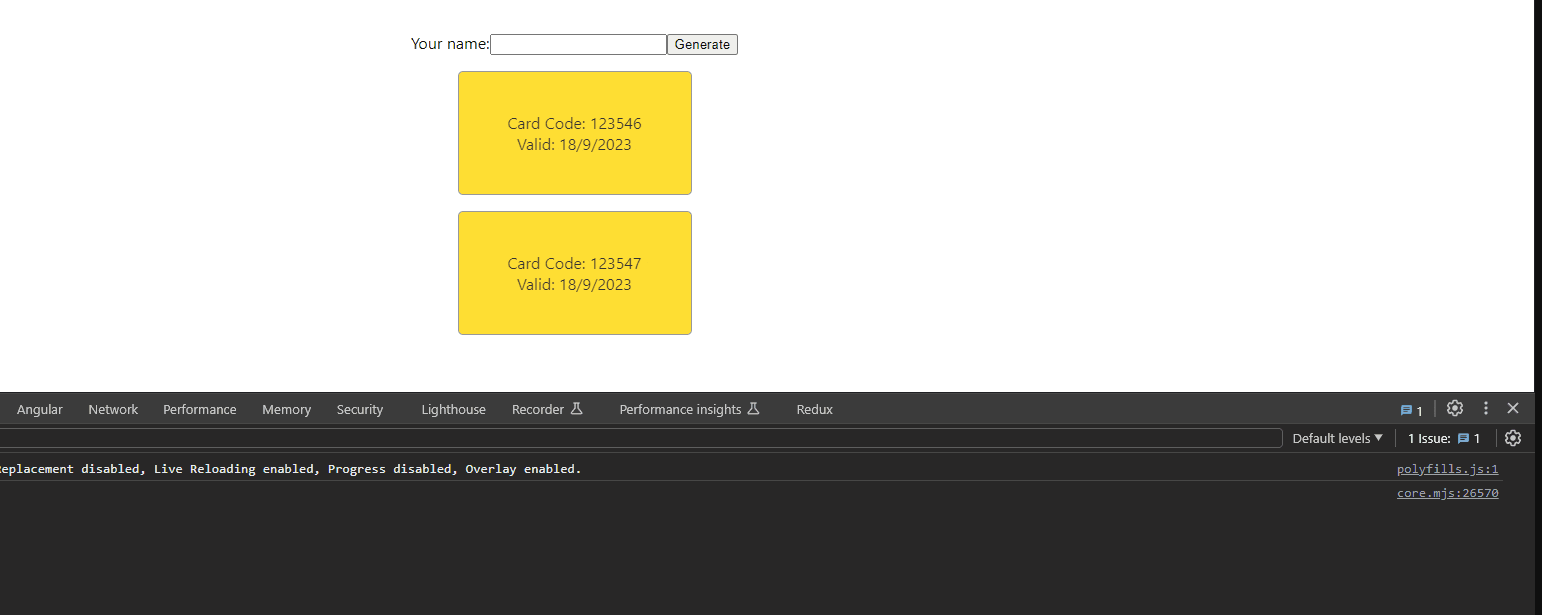
Finally, use a ngFor to iterate over the list of cards
  <div *ngFor="let item of cards()" class="card">
    <span>Card Code: {{item.code}}</span>
    <span>Valid: {{item.validDate}}</span>
  </div>
Save the changes and view the results.
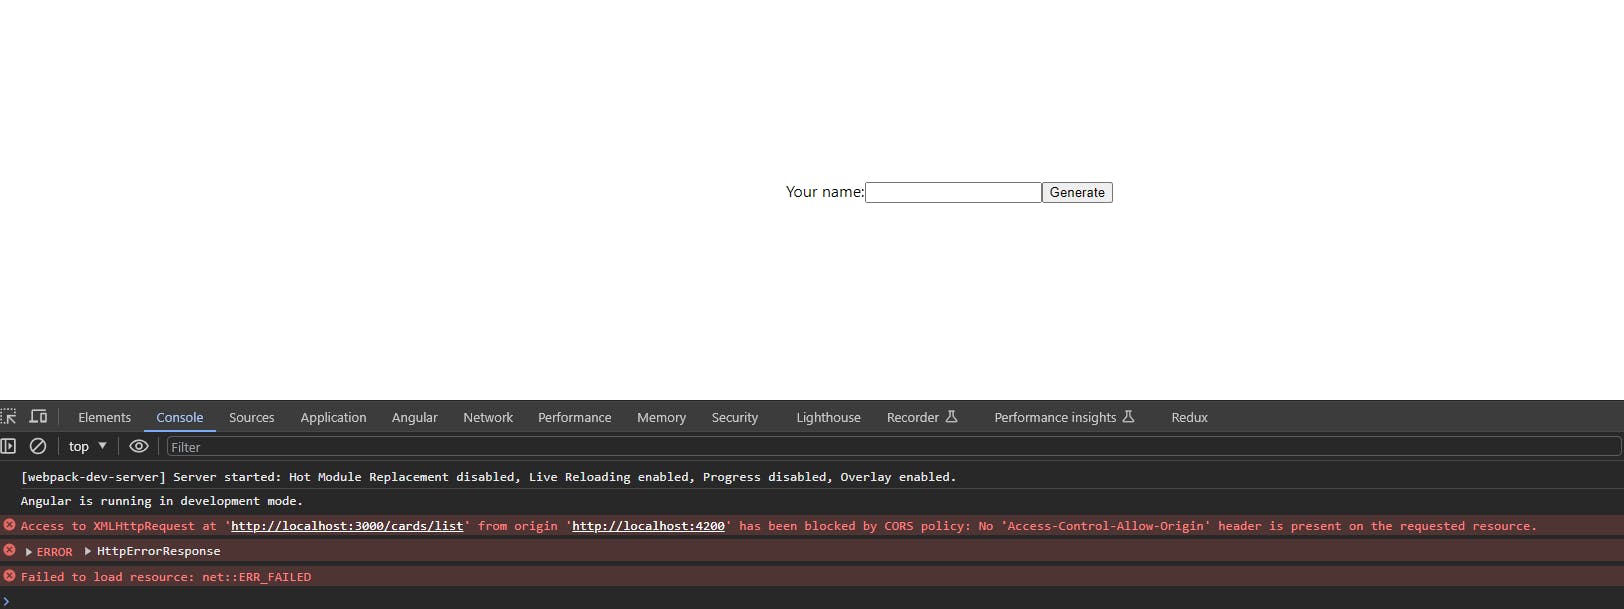
"Oops! CORS error! How can I fix it?"
Enable CORS
NestJS makes it easy to activate CORS. Open the main.ts file in the jumbo_api, and call the enableCors() method to resources to be requested from another domain.
const app = await NestFactory.create(AppModule);
app.enableCors();
await app.listen(3000);
Save changes and reload the jumbo_web.
Yes, we are now able to send and receive data between Angular and Nest!
Dockerize API and Web
To finalize the project, let's dockerize both project jumbo_web and jumbo_api.
We will combine Dockerfiles and Docker Compose to create a more organized structure. To do this, create a new directory called 'jumbo' and move both the 'jumbo_web' and 'jumbo_api' projects into it.
Dockerize API
Go to jumbo_api directory and create the file Dockerfile, it will help us to create the API image.
To learn more about DockerFile
FROM node:alpine

WORKDIR /usr/src/app

COPY package*.json ./
RUN npm install

COPY . .

RUN npm run build

CMD [ "node", "dist/main.js" ]
To create the Docker image, execute the following command: docker build -t jumboapi .
docker build -t jumboapi .
[+] Building 11.9s (11/11) FINISHED                                                                                                                         docker:default
 => [internal] load build definition from Dockerfile                                                                                                                  0.0s
 => => transferring dockerfile: 188B                                                                                                                                  0.0s
 => [internal] load .dockerignore                                                                                                                                     0.0s
 => => transferring context: 2B                                                                                                                                       0.0s
 => [internal] load metadata for docker.io/library/node:alpine                                                                                                        1.0s
 => [1/6] FROM docker.io/library/node:alpine@sha256:d75175d449921d06250afd87d51f39a74fc174789fa3c50eba0d3b18369cc749                                                  0.0s
 => [internal] load build context                                                                                                                                     2.1s
 => => transferring context: 1.39MB                                                                                                                                   2.0s
 => CACHED [2/6] WORKDIR /usr/src/app                                                                                                                                 0.0s
 => CACHED [3/6] COPY package*.json ./                                                                                                                                0.0s
 => CACHED [4/6] RUN npm install                                                                                                                                      0.0s
 => [5/6] COPY . .                                                                                                                                                    4.2s
 => [6/6] RUN npm run build                                                                                                                                           3.2s
 => exporting to image                                                                                                                                                1.3s
 => => exporting layers                                                                                                                                               1.3s
 => => writing image sha256:3fa4954e4cfed2c01b76972bdc6624fdb9bd417e9993bb3a64a5cabc5f59fb73                                                                          0.0s
 => => naming to docker.io/library/jumboapi                                                                                                                           0.0s
The API image has been created perfectly; let's proceed with the Angular app.
Dockerize WEB
Head to the jumbo_web directory, and similarly to the Nest App, copy the source files and compile them. However, serve the Angular app using an NGINX server.
Create an additional Dockerfile for the jumbo_web, with the file code appearing as follows:
FROM node:16-alpine AS build

WORKDIR /app

COPY . .

RUN npm install

RUN npm run build

FROM nginx:alpine

COPY --from=build /app/dist/jumbo_web/ /usr/share/nginx/html

EXPOSE 80
Just like the API, create the Docker image by executing the following command: docker build -t jumboapi .
Using DockerCompose
To orchestrate the creation of containers for both API and WEB images, we use Docker Compose. It takes our images, creates the containers, and shares the network to enable communication.
If you want to learn more about DockerCompose
I won't explain each line in detail, but we define the service associated with the image and specify the Dockerfile, as well as the port and the network for container communication.
Create a new file docker-compose.yml and paste the following code:
version: '3.8'

services:
  jumbo_api:
    image: jumboapi
    build:
      context: jumbo_api
      dockerfile: Dockerfile
    ports:
      - 3000:3000
    networks:
      - jumbo_net
  jumbo_web:
    image: jumboweb
    build:
      context: jumbo_web
      dockerfile: Dockerfile
    ports:
      - 3001:80
    networks:
      - jumbo_net
networks:
  jumbo_net:
    driver: bridge
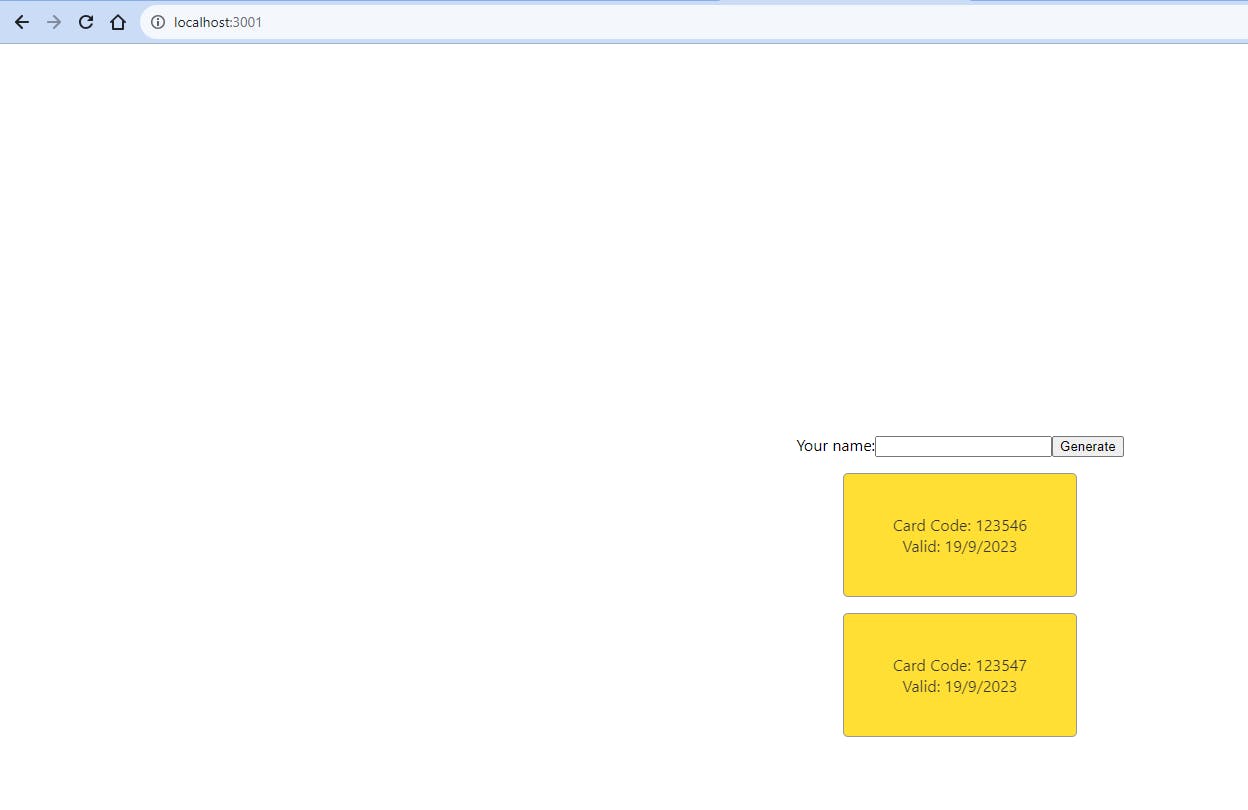
To build and run the containers run the command : docker-compose up
✔ Container nest_learn_project-jumbo_web-1  Created                                                                                                                  0.0s
✔ Container nest_learn_project-jumbo_api-1  Recreated                                                                                                                0.0s
Attaching to nest_learn_project-jumbo_api-1, nest_learn_project-jumbo_web-1
nest_learn_project-jumbo_api-1  | [Nest] 1  - 09/19/2023, 12:24:39 PM     LOG [NestApplication] Nest application successfully started +2ms
Perfect we can navigate to the web yeah!
Recap
We learned how easy it is to create an API with NestJS, add a controller, manage GET and POST requests, read parameters, handle responses, and connect the API with Angular. We also faced challenges such as enabling CORS and deploying our API and web apps in containers using Dockerfile and Docker Compose.
If you're interested in learning more, feel free to check out the official documentation or subscribe for future articles.
If you're curious, go ahead and take a peek at the source code. Yay!