


Photo by Andrew Shelley on Unsplash
Head Start With Standalone Components in Angular 15
Build a small app with Standalone Components in Angular


Table of contents
- The Scenario
- Setup The Project
- Create Your First Standalone Components
- Register and Use Standalone Components
- Use Standalone Child Components
- Use External Modules with Standalone Components
- The Navigation and Routing To Standalone Components
- Add Lazy loading Standalone Components.
- Convert Module-Less Application
- Recap
Since version 15, Angular introduced Standalone Components as an easy way to build module-less applications. One of the benefits of Standalone Components is that they make Angular easier for new developers to learn and use, as they do not require an understanding of the NgModule concept.
👉🏽 Aqui puedes leer articulos español sobre la version 15 de Angular
The Scenario
Today, we will build a standard module Angular app using CLI/14 to learn the following points.
Create standalone components.
Use standalone components in the
app.module.Use standalone components with a child's standalone.
Use Modules inside a standalone component.
Routing and Lazy loading with Standalone Components.
Convert to modules-less apps.
Setup The Project
To create a new Angular project with the latest version of the @angular/cli package using npx, we can follow these steps:
npx @angular/cli new landing-page
It generates a standard angular application with the app.module and app.component.ts.
The file structure is as follows:
src
    app/
        components/
        pages/
        app.component.css
        app.component.ts
        app.component.html
        app.module.ts
        app.routes.ts
    assets
    enviroments
    favicon.ico
    index.html
    main.ts
    polyfills.ts
    styles.css
    and more files.
Create Your First Standalone Components
The Angular/cli support generates standalone components using a special flag --standalone.
For example, we will generate the container layout by running the following command.
ng g c components/container-layout --standalone
CREATE src/app/components/container-layout/container-layout.component.html (31 bytes)
CREATE src/app/components/container-layout/container-layout.component.spec.ts (658 bytes)
CREATE src/app/components/container-layout/container-layout.component.ts (409 bytes)
CREATE src/app/components/container-layout/container-layout.component.css (0 bytes)
The component has two new properties, but with some points.
import { Component } from '@angular/core';
import { CommonModule } from '@angular/common';

@Component({
  selector: 'app-container-layout',
  standalone: true,
  imports: [CommonModule],
  templateUrl: './container-layout.component.html',
  styleUrls: ['./container-layout.component.css']
})
export class ContainerLayoutComponent  { }
The CLI doesn't add to the
app.module.The imports property section allows adding other modules like
HttpClientModule, andFormsModule. By default, import theCommonModule.The
standaloneproperty is set astrueto mark the component as standalone.
Add the following html to provide a layout for the app.
<div class="container">
    <ng-content></ng-content>
</div>
<footer>2022</footer>
Register and Use Standalone Components
The container-layout component is not part of the app.module to use in the app.component. Open the app.module and include it in the imports section.
- Similar as we work with modules.*
import { NgModule } from '@angular/core';
import { BrowserModule } from '@angular/platform-browser';
import { AppComponent } from './app.component';
import { ContainerLayoutComponent } from './components/container-layout/container-layout.component';

@NgModule({
  declarations: [
    AppComponent
  ],
  imports: [
    BrowserModule,
    ContainerLayoutComponent
  ],
  providers: [],
  bootstrap: [AppComponent]
})
export class AppModule { }
Open the app.component.html and use the component.
<app-container-layout>
</app-container-layout>
Save the app is ready to use container-layout standalone components. The next step is to use a standalone child component.
Use Standalone Child Components
Similarly, as we did with container-layout, generate a new standalone component logo component with the cli using the flag --standalone.
ng g c logo --standalone
CREATE src/app/logo/logo.component.html (19 bytes)
CREATE src/app/logo/logo.component.spec.ts (580 bytes)
CREATE src/app/logo/logo.component.ts (362 bytes)
CREATE src/app/logo/logo.component.css (0 bytes)
The logo component shows the image in the container-layout component.
import { Component, Input, OnInit } from '@angular/core';
import { CommonModule } from '@angular/common';

@Component({
  selector: 'app-logo',
  standalone: true,
  imports: [CommonModule],
  templateUrl: './logo.component.html',
  styleUrls: ['./logo.component.css']
})
export class LogoComponent  {
  @Input() logoName = 'https://avatars.dicebear.com/api/adventurer-neutral/mail%40ashallendesign.co.uk.svg'
}
<img [src]="logoName">
Add the logo component inside the layout to the imports section.
import { Component } from '@angular/core';
import { CommonModule } from '@angular/common';
import { LogoComponent } from '../logo/logo.component';

@Component({
  selector: 'app-container-layout',
  standalone: true,
  imports: [CommonModule, LogoComponent],
  templateUrl: './container-layout.component.html',
  styleUrls: ['./container-layout.component.css']
})
export class ContainerLayoutComponent  {
}
Use the <app-logo> component in the layout component template.
<app-logo></app-logo>
<div class="container">
    <ng-content></ng-content>
</div>
<footer>2022</footer>
Save changes, and the app.component will shows the layout with the logo in the app.
Use External Modules with Standalone Components
We to learn how to use external modules like ReactiveForms in the standalone component. First create a new standalone component registration using the CLI.
ng g c register --standalone
CREATE src/app/register/register.component.html (23 bytes)
CREATE src/app/register/register.component.spec.ts (608 bytes)
CREATE src/app/register/register.component.ts (378 bytes)
CREATE src/app/register/register.component.css (0 bytes)
Next, import the ReactiveFormsModule in the imports section to create the form. Using the FormGroup ,FormControl declare with fields name and email.
import { Component } from '@angular/core';
import { CommonModule } from '@angular/common';
import { FormControl, FormGroup, ReactiveFormsModule } from '@angular/forms';

@Component({
  selector: 'app-register',
  standalone: true,
  imports: [CommonModule,  ReactiveFormsModule],
  templateUrl: './register.component.html',
  styleUrls: ['./register.component.css']
})
export class RegisterComponent  {

  registerForm = new FormGroup({
    name: new FormControl(''),
    email: new FormControl(''),
  });


  sendForm() {
    console.log(this.registerForm.value);
  }
Finally, add the sendForm method to show the form values in the html. Add the markup HTML to the form linking the ngSubmit with the sendForm method.
<form [formGroup]="registerForm" (ngSubmit)="sendForm()">

  <label for="first-name">Name: </label>
  <input id="first-name" type="text" formControlName="name">

  <label for="email">Email</label>
  <input id="email" type="email" formControlName="email">
  <button type="submit">Send</button>
</form>
Read more about Reactive forms.
Perfect! We are using ReactiveForms Module in the standalone components; our next stop is routing with standalone components.
The Navigation and Routing To Standalone Components
The Navigation and the Routing makes we use external modules like RouterModule, we going start with the navigation.
First, Create a standalone navigation component using Angular CLI.
 ng g c navigation --standalone
CREATE src/app/components/navigation/navigation.component.html (25 bytes)
CREATE src/app/components/navigation/navigation.component.spec.ts (622 bytes)
CREATE src/app/components/navigation/navigation.component.ts (386 bytes)
CREATE src/app/components/navigation/navigation.component.css (0 bytes)
Because the navigation needs to access the routerLink and routerLinkActive directives, import the RouterModule in the navigation component.
import { Component, OnInit } from '@angular/core';
import { CommonModule } from '@angular/common';
import { RouterModule } from '@angular/router';

@Component({
  selector: 'app-navigation',
  standalone: true,
  imports: [CommonModule, RouterModule],
  templateUrl: './navigation.component.html',
  styleUrls: ['./navigation.component.css']
})
export class NavigationComponent {

}
Update the HTML with the following markup with the navigation menu using router directives.
<ul class="navigation">
  <li>
    <a routerLink="/home" routerLinkActive="active">Home</a>
  </li>
  <li>
    <a routerLink="/domains" routerLinkActive="active">Others Domains</a>
  </li>
  <li>
 <a routerLink="/about" routerLinkActive="active">About</a>
  </li>
</ul>
The navigation must be part of the container-layout component import and use in the html.
import { Component } from '@angular/core';
import { CommonModule } from '@angular/common';
import {LogoComponent} from "../logo/logo.component";
import {NavigationComponent} from "../navigation/navigation.component";


@Component({
  selector: 'app-container-layout',
  standalone: true,
  imports: [CommonModule, LogoComponent, NavigationComponent],
  templateUrl: './container-layout.component.html',
  styleUrls: ['./container-layout.component.css']
})
export class ContainerLayoutComponent  { }
<app-logo></app-logo>
<app-navigation></app-navigation>
<div class="container">
    <ng-content></ng-content>
</div>
<footer>2022</footer>
The navigation is ready, so we need to create the navigation pages and routes.
Next, create the component's home and domains, and using the Angular CLI, these components work as pages for the routing.
ng g c domains --standalone
CREATE src/app/pages/domains/domains.component.html (22 bytes)
CREATE src/app/pages/domains/domains.component.spec.ts (601 bytes)
CREATE src/app/pages/domains/domains.component.ts (374 bytes)
CREATE src/app/pages/domains/domains.component.css (0 bytes)
ng g c about --standalone
CREATE src/app/pages/about/about.component.html (20 bytes)
CREATE src/app/pages/about/about.component.spec.ts (587 bytes)
CREATE src/app/pages/about/about.component.ts (366 bytes)
CREATE src/app/pages/about/about.component.css (0 bytes)
Add the following HTML to the components of the page:
domains:
<h2>Other domains</h2>
<ul>
  <li>www.aprendetesting.com</li>
  <li>www.aprende-singlespa.com</li>
</ul>
About:
<h1>About</h1>
  <p>Lorem ipsum dolor sit amet consectetur adipisicing elit. Facilis perspiciatis, sunt laudantium architecto repellendus illo aspernatur minus tenetur consequuntur facere vitae natus molestiae, in, ad et. Laborum sed amet adipisci et recusandae, illo perferendis quae deleniti id modi laboriosam ullam nulla expedita sit labore. Odit, vel exercitationem iure vitae dolores sequi labore quasi nemo, non optio rem totam obcaecati aspernatur culpa nihil perferendis itaque corporis in maxime dolorem quidem magni? Facere cupiditate fuga sunt quam praesentium. Dicta id explicabo obcaecati.
</p>
The home component will use the register standalone inside, so like we did before, add the registration form in the imports section.
import { Component } from '@angular/core';
import { CommonModule } from '@angular/common';
import { RegisterComponent } from '../../components/register/register.component';
@Component({
selector: 'app-home',
standalone: true,
imports: [CommonModule, RegisterComponent ],
templateUrl: './home.component.html',
styleUrls: ['./home.component.css']
})
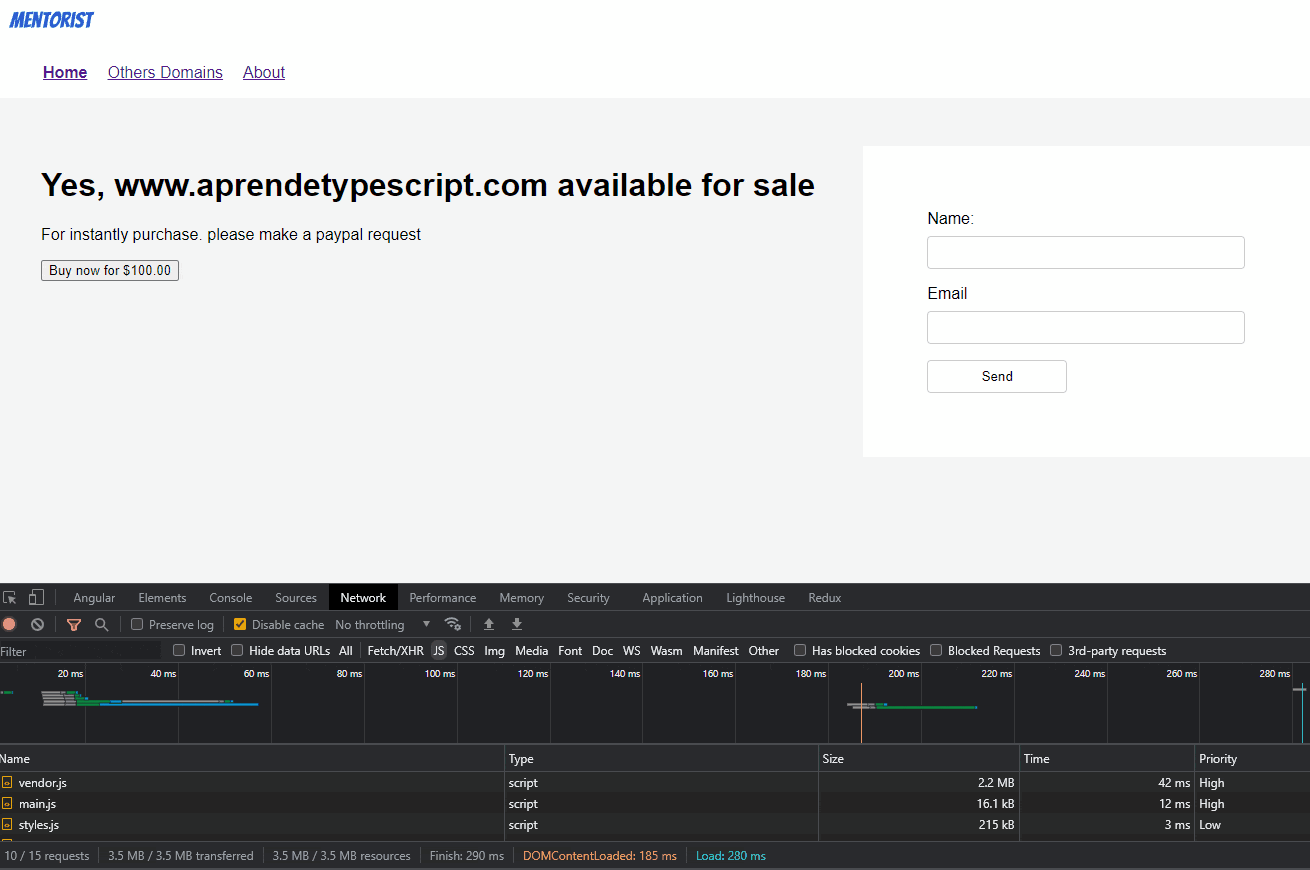
export class HomeComponent {
domainName = "www.aprendetypescript.com";
price = 100;
}
Use add the markup with the app-register component.
<div class="sections">
  <div class="welcome">
    <h1>Yes, {{domainName}} available for sale</h1>
    <p>For instant purchase. please make a PayPal request</p>
    <button>Buy now for {{price | currency}}</button>
  </div>
  <app-register></app-register>
</div>
Configure Routing
Like we always do with routing, nothing is different. We declare an array of routes with a path and component to load.
Learn more about Routing in Angular
import { Routes } from '@angular/router';
import { AboutComponent } from './pages/about/about.component';
import { DomainsComponent } from './pages/domains/domains.component';
import { HomeComponent } from './pages/home/home.component';

export const routes: Routes = [
  {
    path: '',
    redirectTo: 'home',
    pathMatch: 'full'
  },
  {
    path: 'home',
    component: HomeComponent,
  },
  {
    path: 'domains',
    component: DomainsComponent
  },
  {
    path: 'about',
    component: AboutComponent
  }
]
In the app.module, import the RouterModule passing the routes.
 @NgModule({
   declarations: [
     AppComponent
   ],
   imports: [
     BrowserModule,
     ContainerLayoutComponent,
     RouterModule.forRoot(routes)
   ],
   providers: [],
   bootstrap: [AppComponent]
 })
export class AppModule { }
Edit the app.component.html and add the router outlet to show the components.
<app-container-layout>
  <router-outlet></router-outlet>
</app-container-layout>
Perfect, we Open the app and navigate to the pages using the navigation.
Add Lazy loading Standalone Components.
Like we work lazy loading modules, we have a slight change for standalone components to the loadComponent function.
Change the component to the loadComponent() function, passing the function to load the component.
import { Routes } from '@angular/router';

export const routes: Routes = [
  {
    path: '',
    redirectTo: 'home',
    pathMatch: 'full'
  },
  {
    path: 'home',
    loadComponent: () => import('./pages/home/home.component').then(m => m.HomeComponent)
  },
  {
    path: 'domains',
    loadComponent: () => import('./pages/domains/domains.component').then(m => m.DomainsComponent)
  },
  {
    path: 'about',
    loadComponent: () => import('./pages/about/about.component').then(m => m.AboutComponent)
  }
]
Save the changes, reload and navigate to each section and the chunked return for each component.
Convert Module-Less Application
We are in the final step with standalone components. To convert the to module-less, we need to make some changes.
First, convert the app.component.ts to standalone components. Add the standalone property to true and import the required components or modules.
import { Component } from '@angular/core';
import {CommonModule} from "@angular/common";
import {RouterModule} from "@angular/router";
import {ContainerLayoutComponent} from "./components/container-layout/container-layout.component";


@Component({
  selector: 'app-root',
  standalone: true,
  imports: [CommonModule, RouterModule, ContainerLayoutComponent],
  templateUrl: './app.component.html',
  styleUrls: ['./app.component.css']
})
export class AppComponent {
  title = 'landing-page';
}
Open the main.ts , we going to do some changes on it:
import { enableProdMode } from '@angular/core';
import { platformBrowserDynamic } from '@angular/platform-browser-dynamic';

import { AppModule } from './app/app.module';
import { environment } from './environments/environment';

if (environment.production) {
  enableProdMode();
}

platformBrowserDynamic().bootstrapModule(AppModule)
  .catch(err => console.error(err));
To use the bootstrapApplication and provideRouter functions, we need to import them from the @angular/platform-browser-dynamic and @angular/router packages, respectively. We can then use these functions to bootstrap our Angular application and configure the router.
First remove the platformBrowserDynamic.
platformBrowserDynamic().bootstrapModule(AppModule)
To use the bootstrapApplication function, we need to provide it with two parameters: the main or root component, which in our case is AppComponent, and a configuration object as the second parameter, which may include providers and other options.
We can use the provideRouter function to configure the RouterModule, which requires us to declare the routes first. Once the routes are declared, we can pass them to the provideRouter function as an argument. This will create a router provider that we can then include in the providers array of the configuration object.
The final code looks like:
import {enableProdMode, importProvidersFrom} from '@angular/core';
import { environment } from './environments/environment';
import {bootstrapApplication} from "@angular/platform-browser";
import {AppComponent} from "./app/app.component";
import {RouterModule} from "@angular/router";
import {routes} from "./app/routes";

if (environment.production) {
  enableProdMode();
}

bootstrapApplication(AppComponent, {
    providers:[
        provideRouter(routes)
    ]

})
  .catch(err => console.error(err));
Finally, remove the app.module.ts, and convert our app to a module-less app with lazy loading, routing, and using external modules like dynamic forms.
Recap
We learned how to create standalone components, load modules, use standalone components, routing, and lazy loading. I hope it helps you to build your module-less app.
Read more about Standalone Components: