


How To Head Start with Testing in Angular with Jasmine
Jasmine Testing for Angular: Step-by-Step Instructions


I worked for several months with Jest and Vue, but nowadays, I'm working with Angular, and the testing is part of my learning process.
I will explain a bit about Jasmine and how to write a test for typescript classes. If you find something wrong, please notify us by Twitter @danywalls.
The testing in Angular
Angular born ready to be testable. It comes with Protractor, Jasmine, and Karma to help us build unit and E2E tests.
The Angular-CLI provides scaffolding to build and run those tests, and also, Jasmine and Karma also help to run your test during the development or make process.
Unit tests
The unit test is to check an essential piece or unit of code, which means our test only tests one responsibility of our code.
The Unit test is to test functions, objects, and more.
The Jasmine framework is the framework that Angular uses to write these tests.
Jasmine functions
Jasmine framework comes with several functions. You don't need to memorize everyone but with fundamentals like describe and expect.
describe help to group a series of tests, aka a test suite it takes two parameters, a string and a callback.
describe("my group of invoice tests", () => {} );
it function to help create a specific test, close similar to describe but is used to write the test.
it("the number should be positive", () => {});
expect function play with our test that confirms that the test works as expected, it asserts our code. The expect function is where I pass in the value, and the matcher function gives the predicted value.
Some of the common matcher functions are toBe(), toBeTrurty() or toEqual().
expect(true).toBeThruthy();
The unit test files convention is filetotest.spec.ts. By default, angular-cli generate app.spect.ts, and you run the test with the ng test command.
Write basic unit test with Jasmine
Time to put my skills to the test and practice what I just learned by writing a small test using describe for the Gif class.
export class Gif {
  private _url: string;
  urlValidator = new RegExp(/^(ftp|http|https):\/\/[^ "]+$/);
  public get url(): string {
    return this._url;
  }
  public set url(v: string) {
    this._url = v;
  }
  public get isvalid(): boolean {
    return this.urlValidator.test(this.url);
  }
}
WAIT JUST A MOMENT!
I know the testing in Angular is scary for many developers, including me. Do you want to understand Angular testing, from the basic to the advanced parts, and which are important for real-world scenarios?
Take a look at "Conscious Angular Testing" by Decoded Frontend – now with a special discount!

The course clearly explains things like Testbed, setting up tests, lifecycle hooks, and adding dependencies. It teaches you how to write non-fragile tests, deal with standalone components, content projection, inject testing, services, components with dependencies and more.
After this, I am no longer scared of writing tests in Angular.
What can I test?
If the public properties URL and isValid have the expected value.
The behavior is like when a not valid url the gif is invalid.
If can create an instance.
If the URL can be assigned.
Let's go!
1- Import the Gif class and describe it to define the test group.
import { Gif } from './gif';
describe('Gif Class tests', () => {

}
2- Using it function, define the test about a valid class constructor and expect to validate it is not null.
import { Gif } from './gif';
describe('The Gif', () => {
  it('should to have a valid constructor', () => {
    const gif = new Gif();
    expect(gif).not.toBeNull();
  });
}
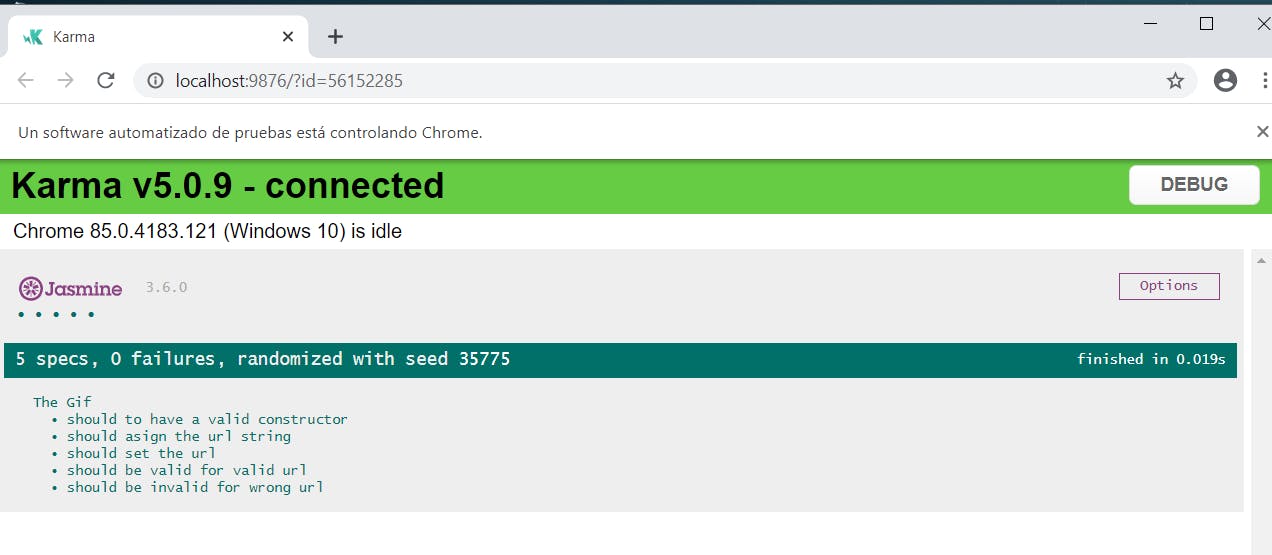
Run our tests with ng test from CLI.
Chrome 85.0.4183.121 (Windows 10): Executed 1 of 1 SUCCESS (0.035 secs / 0.01 secs)
TOTAL: 1 SUCCESS
I am adding the rest tests for the public properties.
import { Gif } from './gif';
describe('The Gif', () => {
  it('should to have a valid constructor', () => {
    const gif = new Gif();
    expect(gif).not.toBeNull();
  });

  it('should set the url', () => {
    const gif = new Gif();
    gif.url = 'http://google.com';
    expect(gif.url).not.toBeNull();
  });

  it('should be invalid gif for wrong url', () => {
    const gif = new Gif();
    gif.url = 'ht';
    expect(gif.isvalid).toBe(false);
  });

  it('should be valid gif for valid url', () => {
    const gif = new Gif();
    gif.url = 'http://www.google.com';
    expect(gif.isvalid).toBe(true);
  });

  it('should asign the url string', () => {
    const gif = new Gif();
    const expectedUrl = 'http://www.google.com';
    gif.url = expectedUrl;
    expect(gif.url).toEqual(expectedUrl);
  });
});
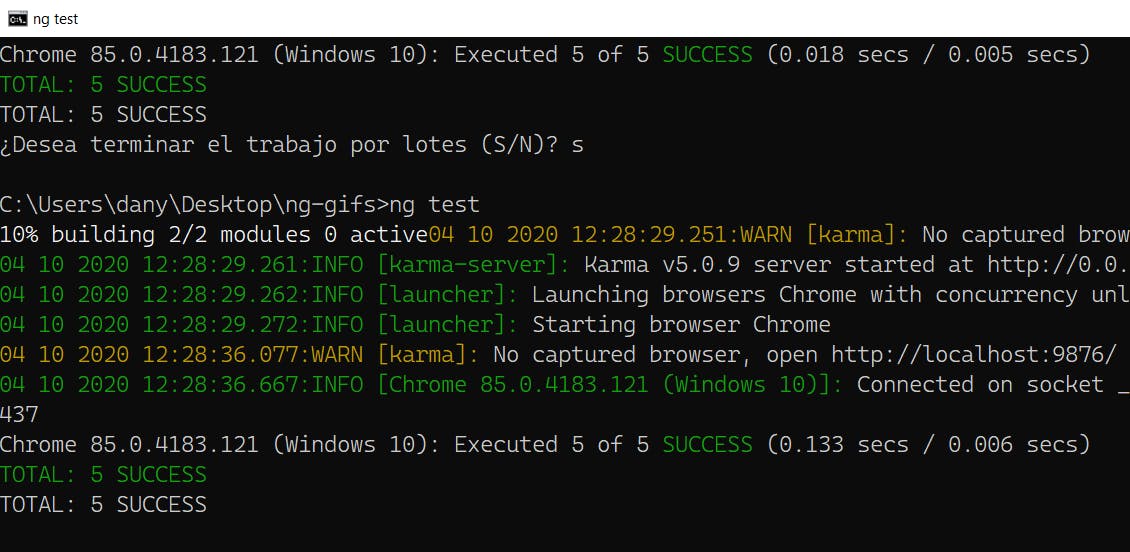
Then run the ng test command to get the results.
Refactor tests with beforeEach and afterEach
If we read the code, it creates a gif instance for each test; it is not the best approach. Jasmine provides a solution for the setup of the test with beforeEach() and afterEach() function.
The beforeEach function helps run code before each test. In this case, we declare a variable as a gif type and initialize it for each test.
describe('The Gif', () => {
  let gif: Gif = null;
  beforeEach(() => {
    gif = new Gif();
  });
    ...
The same is true for afterEach. Assign the gif instance to null.
afterEach(() => {
    gif = null;
  });
The final code looks like this:
import { Gif } from './gif';
describe('The Gif', () => {
  let gif: Gif = null;
  beforeEach(() => {
    gif = new Gif();
  });
  it('should to have a valid constructor', () => {
    expect(gif).not.toBeNull();
  });

  it('should set the url', () => {
    gif.url = 'http://google.com';
    expect(gif.url).not.toBeNull();
  });

  it('should be invalid for wrong url', () => {
    gif.url = 'ht';
    expect(gif.isvalid).toBe(false);
  });

  it('should be valid for valid url', () => {
    gif.url = 'http://www.google.com';
    expect(gif.isvalid).toBe(true);
  });

  it('should asign the url string', () => {
    const expectedUrl = 'http://www.google.com';
    gif.url = expectedUrl;
    expect(gif.url).toEqual(expectedUrl);
  });
  afterEach(() => {
    gif = null;
  });
});
Run the new tests with the ng test command from your terminal.
ng test
Done!
You should feel confident about writing your first tests using Jasmine for your Angular Apps.